***This post contains affiliate links. If you click on one and make a purchase, I will receive a commission.*** Last week I posted some cozy Fall wreaths and that was just the kick in the pants I needed to actually get started on my own fall wreath. Rather than an exact replica of any of the inspiration wreaths, I kind of melded a few together. What I came up with is this lovely, fallish DIY Upcycled Fall Sweater Wreath.

How many things do I love about this wreath? Let’s see, it’ pretty and cozy looking. It came together in about 20 minutes start to finish. It was free. Yup, free, because I borrowed all of the materials from other spots in the house. Namely my sweater drawer and my sons bag of clothes he has outgrown.
So, ready to make your own? Here’s how.
Materials

Mod Podge and a small paint brush
Floral Pins – (I stole mine from an old wreath, but these are available from Amazon)
Wreath Form (I used an old one, but you can buy one from Amazon, too!)
Glue Gun – Not pictured, but I did use one in a couple of spots.
Eucalyptus Sprigs – I had these from an earlier project, but you can buy a bunch from the grocery store for about $6
An Old Sweater, preferably cable knit
An Old Plaid Shirt
- Cut your sweater into strips, about 3 inches wide.

2. Wrap the sweater strips around the wreath form, securing with the floral pins, covering the wreath form completely and overlapping for added coziness.
3. Cut strips (about 12-18 inches long) from your plaid shirt, then fold in half lengthwise and secure with Mod Podge:

4. Form one end of the folded strip into a point and secure with mod podge:

5. Begin wrapping and twisting the strip around the point to form a florette:

I made two florettes because I got a little bored with this part of the project, but you can make as many as you want! Here’s more of a close up of the florettes. (Do you ever say (or type) a word over and over again and start to think it’s not really a word after all? That’s going on with florettes right now. I’m pretty sure I made that up).

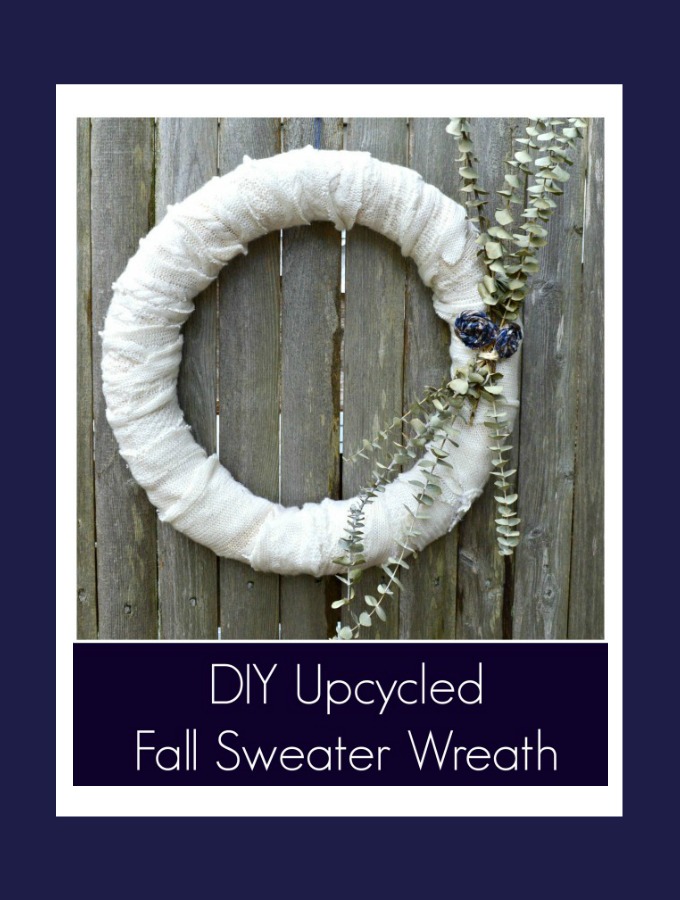
6. Attach the bunch of Eucalyptus to the wreath form using floral pins. You can get creative with this part. Try a few different lay out options and pick what you like best
7. Add your florettes to the wreath with a hot glue gun. Again, play around with the placement and see what you like best.
8. Use your glue gun to hold down any unruly parts of the sweater.

That’s it, guys! Wreath, done! Hang that baby up.
(Which reminds me, I never remember to mention how I hang the wreaths after I make them. I basically just secure a looped piece of string or twine to the back of the wreath with a glue gun and then hang it from a tack or nail).