
Before you get too excited, I’m not talking about painting with wine, I’m talking about rubbing alcohol. Although, feel free to add the wine if you like. Just drink it, don’t paint with it. Or maybe wine is a fantastic additive for paint.
What do I know? I’m just a humble crafter.
The point is people, you can make totally awesome art with wine and alcohol! No, I mean sharpies and alcohol! I swear I didn’t drink any alcohol in the making of this craft. It must be the Sharpie fumes.
Who wants to learn how to paint with Sharpies and Alcohol? (and wine). Well, let’s do it!
***This post contains affiliate links. If you click one and make a purchase, I may receive a commission at no cost to you.***
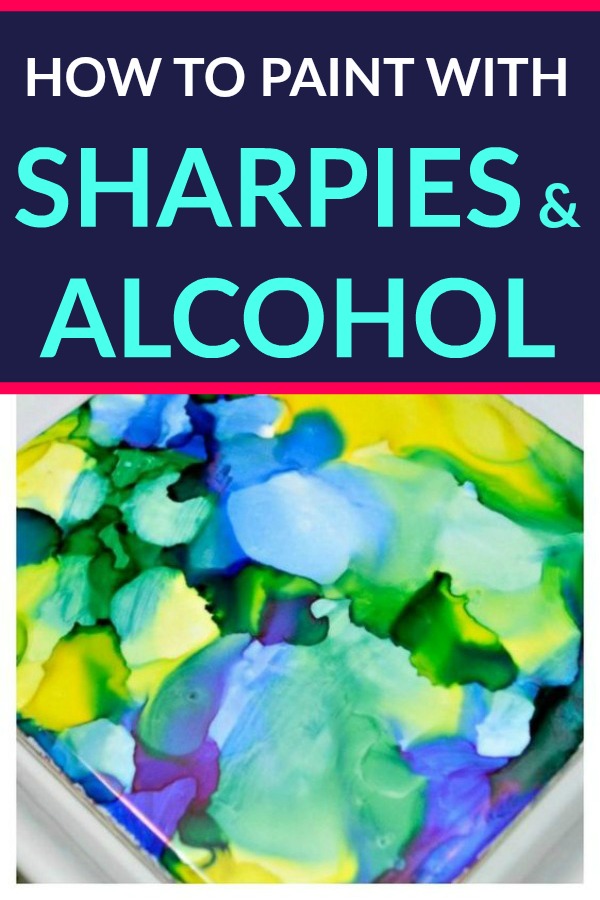
How To Paint with Sharpies and Alcohol
This is a crazy easy craft. The painting part is ridiculously easy and you can almost not mess it up. If you do manage to mess it up, I show you how to fix it. Or you can just wipe the tile off and start again.
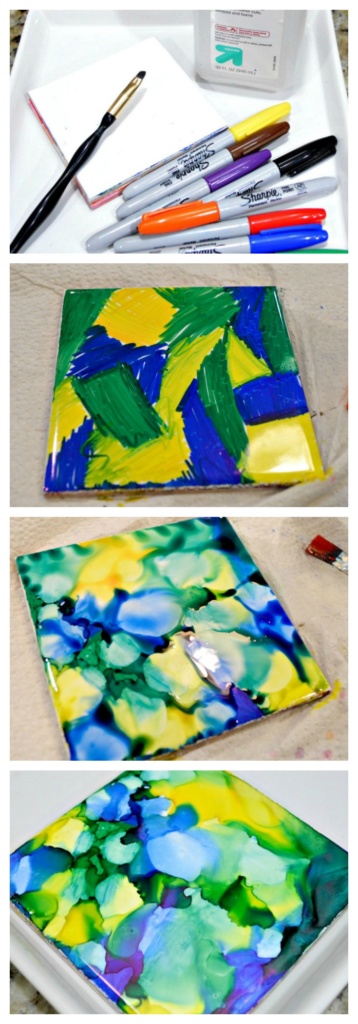
Materials

91% Rubbing Alcohol, not the 70%**
4.25 x 4.25 inch ceramic tiles (or whatever size you want!)
Small paint brush (you could also use a dropper or a small straw)
Krylon UV Resistant Clear Acrylic Coating
**Important Note: When I went to get my supplies, I saw that there is 91% alcohol and there is 70% rubbing alcohol. I got the 70% alcohol. I did that purposely because I am going to be using this method with a bunch of 12 and 13 year olds and I was worried about the smell of alcohol. Well, the 70% was a total bust. I started over with the 91% and all was right with the crafting world. And there was no difference to me in the smell.
Instructions
Step 1: Clean off your tiles. I bought my tiles from Home Depot for less than a dollar each. They had what I can only assume is a protective strip of netting on them that I removed. Dry the tiles well.
Step 2: Color your tile with coordinating Sharpie colors. Don’t be scared, they look really bad until you put the alcohol on them. You can color small areas with different colors as in the tile below, or you can cover a greater amount of area with each color. Totally up to you!
Step 3: With your paint brush, small straw or dropper, drop small amounts (about dime size) of the alcohol onto the colored tile. You’ll almost immediately see the alcohol start to blur the colors. I sort of concentrated on the areas where the colors met so that those lines would be well blurred. After dropping some alcohol on random spots on the tile, stop and look at the tile. Do you see spots that need a droplet? Add one. BUT! Don’t add too much alcohol to the tile. I’ll show you why in a minute.

Step 4: When you are happy with the amount of blurring from the alcohol, you can stop and let the tile dry. OR, you can be a nosy artist like me and dab at the colors with a paint brush. Or, you can be like my daughter and actually pull the paint brush through the colors, which I thought was going to totally ruin the whole thing! But, it didn’t. Her tile came out different than the others, but very cool! See below:

If you’re wondering, she used red, yellow and purple sharpies for this tile. I can’t lie. I watched her making it and I was like, “Oh my God, that is going to be so bad and I’m going to have to pretend to like it when she’s done”. But guess what? It’s probably my favorite! It’s a completely different look than mine. Her colors are a little more muted whereas mine are more in your face. That sentence has so many meanings.

Important Note: You must let your tiles dry when you are done adding your alcohol and dabbing at them with your paint brush, if you chose to dab at them with a paint brush. Give them a good 30 minutes and then go look at them.
Did they come out weird with a weird sort of washed out spot where you can see the lines from your Sharpie? Don’t worry, I did that, too. I’m pretty sure it means you added too much alcohol (too much alcohol is bad for everything).
But it’s an easy fix! Grab your Sharpies and add some more color then add a little more alcohol to get the blurring going again. (This is not what you should do if you have added to much alcohol to your body. Generally, adding more alcohol to a problem that was caused by too much alcohol is never a good thing. Except when we’re talking about painting tiles).

Step 5: The last step in this process is to seal the tiles. These are way to delicate unsealed to use as anything other than something pretty to look at it.
That’s what the Krylon is for. You spray it on as directed by the can and then let it dry for a while. However, I tested a few different methods for how to seal them and you can read about that in the post “How To Seal Painted Tiles”. Depending on what you want to do with the tiles, the Krylon might not be strong enough for you.
What Do You Think?
All in all, this craft is super easy, especially since I’ve now shown you what mistakes to avoid! You’re welcome! And they are definitely high impact. These would be a great craft to make and sell as coasters.
So, now you’ve made four super cool tiles, what are going to do with them? You can make coasters or tile a bench or a mirror or frame them and hang them as art. I think coasters are the best implementation. Just pop a piece of felt on the bottom with some hot glue and call it a day!
As for me, these tiles were a practice round for this project, Hand Painted Wind Chimes!
Learn More Fun and Easy Abstract Art Methods
If you liked it then you shoulda put a pin it!
Oh, so fun! They will love it, it’s such a fun project!
Marybeth
Fabulous project, I love playing with alcohol inks but this is just a perfect way to show my granddaughters how to make some. Thank you so much for all the information. Perfectly presented.
Im using Sharpies and alcohol on glass for a faux stained glass to display as suncatchers. I’ve used a “liquid leading” then colored in the spaces. Applied alcohol. This is far as I am right now. Oh! The glass I am using is from a picture frame! I have attached small eye screws to the back for fishing line. The fishing line will attach to a suction cup. That’s the Plan anyway. I will seal with Varnish, a UV Protectant, and a final sealer.
Cross your fingers!!
Hi There! Yes, I used a glazed ceramic tile. They are, I think .33 cents each at the hardware store. Really inexpensive!
Marybeth
What kind of tile is needed for this? Glazed ceramic tile?
Thanks!
Hi Cynthia! You’d just have to make sure that however you seal them, it is appropriate for where you are laying them. You might check with a pottery place and see if they could be fired. That might work. I haven’t tried it, but I’d love to hear about it if you do!
Marybeth
Hi Joyce! It should work nicely on glass! I would love to see your finished product!
Marybeth
Would it be possible to do the tiles and use the tiles as a back splash?
I do stained glass. Someone mentioned trying it on glass, so As I have excessive amounts of leftover glass, I will try it. I hope it works! I love crafting.
Hi Jane! That’s great! I’m so glad to hear you’re trying them with your class. I haven’t tried waiting 24 hours between the sharpie part and the alcohol part, but I think you would be ok. Maybe test one out before you try it at school?
I’d love to see how they come out!
Marybeth
Hi! Going to try this with my class. Just wondering, could you do the sharpie part and then the alcohol part 24 hours later?
Hi Susan!
I don’t think Hairspray would work because I think there is a lot of alcohol in hairspray. So it would probably reactivate the sharpies.
What will they be used for? If it’s just something to look at, you can try to get a nice smooth layer of mod podge, but if it’s coasters, something that needs to be washed, it really needs a good seal like the resin. Let me know how you do!
Marybeth
I am making these for Christmas for my dad. DO u think it would work to put hairspray for the coating on top?
Hi Lily!
I’ve only tried it with Sharpies, so I’m not sure how well other markers would work. Give it a try and let me know! I’d love to see what you make!
Marybeth
Do these work with only alcohol based makers? Or will this also work with water based markers?
Hi Julene,
I googled Everclear and what I found says that it is 95% alcohol, so it may work. I would try one and see how it comes out.
Marybeth
I haven’t been able to find any rubbing alcohol more than 70%. Would Everclear alcohol work instead?
Hi Brooke!
I love that! I haven’t tried it yet, but it sounds much neater than normal tie dye!.
I know of like a color punch in the face, though. 🙂
Thanks for stopping by!
Marybeth
You can “tie dye” t-shirts (or pants or whatever you want so long as it’s cotton) with sharpies and alcohol too, did it at science camp 20 years ago!! The color doesn’t bleed as much as it does on tiles though so I’d go for a little less of a color punch in the face at least until you get a feel for how much the colors bleed.
Hey Trudii! I’m so sorry I missed your email! Yes, the 90% is the key.
Do you mean the acrylic sealer that I used? Or are you talking about something different?
And yes, I like your attitude, too, Trudii. I didn’t even think of that obvious benefit of wine and alcohol! Relaxing your hand. Obviously! 🙂
Marybeth
Hey Carole! I’ve actually never used it on cardstock. Play around with it and see what you get! 🙂 And then let me know! I’d love to see what you come up with.
Marybeth
What is the secret to using alcohol ink on cardstock? Carole
Thanks for talking about the difference between 71% and 90%. I didn’t think it would matter. I will keep it in mind when l make more. Any ideas about the acrylic and water sprayers to make it better or different ideas? I love your attitude and l agree with wine and alcohol Lol! Good for relaxing your hand to not be so stiff when painting
Hi Madalyn! It does not work as well as the 90%. I did try both and found you don’t get the same effect with the 70% alcohol.
Thanks!
Marybeth
Hi does 70% rubbing alcohol work?
Hi Maryann! I haven’t tried that, so I’m not sure. The paper might be a little too thin to handle the rubbing alcohol. Maybe something thicker, like a card stock, with minimal alcohol? Let me know if you try it!
Marybeth
Can you use the alcohol ink on paper such as copy paper.
Hey Barbies! Awesome! I’d love to see how it comes out!!
Thanks for stopping by,
Marybeth
I am so going to try this fab effect!!!!Barbies
Hi Andria! The tiles don’t take long to seal after you’ve applied the alcohol. Maybe give them an hour? If you use the Krylon to seal them you do have to wait about 24 hours in between coats. That process takes some time. You really want to give the Krylon a chance to completely cure.
Good luck!
Marybeth
Hey there Patti! I did try it on canvas and didn’t get the same effect as the tiles. I think the canvas absorbs too much of the Sharpie. You do get some effect though. If you really have your heart set on doing it on canvas, give it a try! Maybe try sealing the canvas with some Mod Podge first. That might help.
Have fun!
Marybeth
Hi Alison, When I made these, I didn’t wait long between coloring them and using the alcohol, but I don’t think it would make a difference. I’m so glad you enjoyed the post! I hope you try them and if you do, please send me pictures!!
Thank you,
Marybeth
Hi Marilyn
You can make your own alcohol inks quite easily and cheaply. Get some small plastic bottles, I have the type with spray tops. Buy a pack of cheap felt tip pens and some rubber gloves! Break open the pens, cut up the felt core to fit your bottles. Add all the bits form one colour to your bottle, top up with rubbing alcohol. Lid on tight, gentle shake and youve got yourself some alcohol ink at a fraction of the cost!
Just make sure you wear gloves when taking the pens apart! I didn’t and it took a lot of scrubbing to get my hands clean lol
I have a quick question about the time between coloring the tiles and adding the alcohol to the color. Is it bad to wait too long, or does it matter? Thanks for the post – great ideas!
Can the same thing be done on a artist canvas?
How long do you let the tiles dry before sealing them?
Hi Marilyn! I’m so glad it worked out well for you! I’d love to see what you made! Thanks for stopping by! Marybeth
I took a class using alcohol ink and really enjoyed it. However, I lost enthusiasm when pricing the ink. Then I saw your post using markers. I bought markers at Dollar Tree and they work great. I can’t wait to try other materials. Thanks
Great, Joy! I hope they have fun with it! If you aren’t able to seal them, give them a quick coat of mod podge just to protect them from scratches. It won’t be water resistant, but it will give it some protection. Have fun!
Marybeth
I’m going to try this neat idea with my children’s Church class…they love to be messy with markers so it’s a win and beautiful craft..
Thanks so much for the great tips,
Joy
Hi Elizabeth! I would try some resin if you are going to use it as a trivet. I haven’t used the tiles to put anything hot on, but that might work. If you’re getting a dark line of concentrated, you might just need to blur it a little with a paint brush or a q tip. And don’t forget, if you don’t like something, you can always add more sharpie and try again. Or, if you really don’t like something and want to start over, you can pretty much wipe it off with dish soap and water and start fresh! Have fun!! I would LOVE to see how they come out! Marybeth
How should the tiles be sealed and or treated to use as a trivet for hot dishes?? Also when applying the alcohol I get a dark line of concentrated color, am I applying too much alcohol?? Thank you again, Elizabeth!!
Hi Elizabeth,
I bought shiny, too! You should be good to go!
Thanks!
Marybeth
I bought glazed tiles from Home Depot, are those the right ones or should they be not shiny??
Hi Carol,
I have tried it on glass ornaments and it comes out pretty! More of a stained glass effect, but definitely give it a try! Good luck! Thanks,
Marybeth
Hey Barbara! Yes, most definitely!! Thanks for saying hi! Marybeth
Hi Megan!
Thanks so much!!
Marybeth
Very cool!
Great way to use left-over tiles!
Can you use the same method on glass as you did on the tile? I have a pretty glass vase I would like to try it on