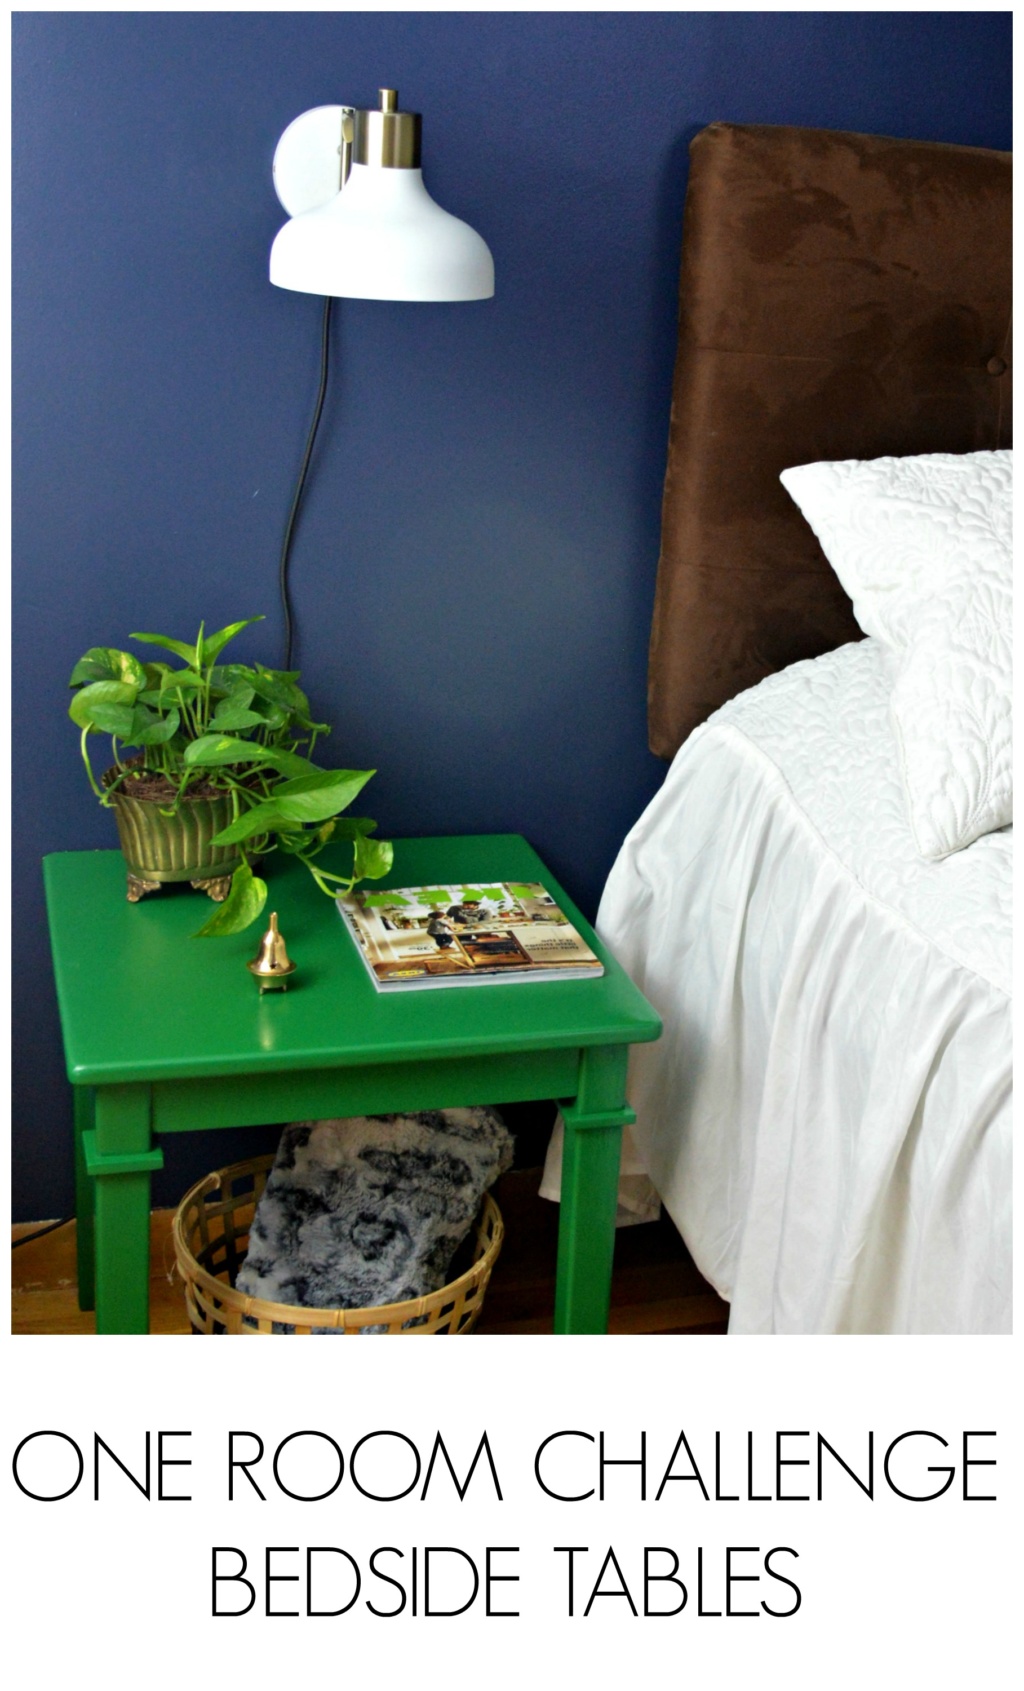
I’m back with another update for the One Room Challenge! I’m a little in awe of myself that I have actually made as much progress as I have. It’s been 5 weeks and I have painted the walls, put up new window treatments and updated the linens and accessories. Nothing like a challenge to get this girl moving. This week I worked on the bedside tables and lighting. This portion of my bedroom has had me up and down all week. I really wanted to purchase new tables, but the one’s that I REALLY want are out of stock. They are also pretty expensive, so it’s probably better that they are out of stock. In the meantime, I did want to do something to jazz up this area a little bit and and I had already decided I wanted to add a few touches of green. I traded the tables I had in the living room with my bedside tables and decided to give them a coat of spray paint.

I really love how these came out. I’ve actually had these little side tables for over a decade. They were super inexpensive, but for some reason they have been very sturdy and a good match for me. If you’ve not worked with spray paint before, it’s fairly easy to do and gives a lot of bang for your buck. There are definitely a few tricks that I’ve learned along the way.

Spray Paint Tip #1
Work in an open area where there is nothing that you wouldn’t mind getting spray paint on. Outside is the best bet and I prefer on the grass because whatever over spray that gets on the grass will eventually get chopped off by the lawnmower. When I painted these tables, the weather was crappy, so I did these in the garage, with the garage door open. You definitely need good ventilation and a ventilation mask is a good idea as well. Spray paint is stinky and you want as much air flow as possible.
Spray Paint Tip #2
Everything you wear should be something you don’t care about getting paint on. Don’t forget that this includes your shoes. Your shoes WILL get spray paint on them. Also, if you have shrunk your painting sweatpants, your ankles WILL get spray paint on them.
Spray Paint Tip #3
Shake the heck out of your spray paint before and while you are using it. I do a good minute of shaking before I start and then I will continue to shake periodically while I am spraying.
Spray Paint Tip #4
Give a light sand to your piece before you start. I really don’t think you need to go too crazy with the sanding. Just a little bit too rough up the surface.
Spray Paint Tip #5
You must be patient and allow for multiple coats. Stay about 10 inches away from the item that you are spraying and constantly move the can back and forth or up and down over the piece, using long, even strokes. If you hold the spray paint too close to the surface and you just blast away at it without consistently moving the can back and forth or up and down you WILL end up with drips and messes. If you are an impatient person, you will need all of your will power to step back, take it slow and allow the coats to build up. I usually give a light coat, walk away for about twenty minutes to allow a little drying, come back and give it another light coat, walk away and repeat until I’m satisfied with the coverage. The tables took about four very light coats. Did I want to get it done in two coats? Of course. But guess what, I don’t have any drips!
Spray Paint Tip #6
This is the second most important tip, next to #5. Do NOT touch, move, brush up against, breathe on your finished project for two days. If you have to move the item indoors, use extreme caution when moving it and try to only touch parts that are not highly visible. Although the paint may feel dry, it hasn’t completed cured for about 48 hours so you do stand the chance of leaving a mark if you handle it too much or place any objects on it prior to that 48 hour mark. Again, patience is truly a virtue when it comes to DIYing.
I have to say, I was extremely patient with these tables, and I’m glad I was. I’m really happy with the finish and the color is nice. It’s bright, but not crazy neon or anything. It adds a little brightness to the navy blue room.
The other exciting addition this week is the installation of the wall lamps! I ended up going with the Crosby Collection Swing Arm Sconce by Threshhold:

I’m really happy with these as well. They are pretty, but sturdy and they were super easy to install. I really wanted to stay under $50 for each sconce and I did achieve that goal. These were $29.99 and I bought them on a day that Target had 10% on home decor and lighting, so in total I spent a little over $50 for both. Super good deal, in my opinion. Here’s a close up of the sconce with the light off. I think this is actually the best representation of the colors in the room that I have been able to capture so far.

And here it is with the light turned on:

See that little brass doo dad there? It’s an incense burner. I’m totally into incense right now. Sandalwood, specifically. My kids think I’m trying to poison them. It’s kind of hilarious.
I’m really excited to get this room finally wrapped up in the next week! I still have a lot to do, but I’m going to really push through and get as much done as can so that I can pick a sunny day either over the weekend or early next week to take some pictures of the finished product! If you want to check out my progress from the beginning, here are the links: