I love a good resin project and I was so happy when my friend Sasha from Life’s Carousel offered up this amazing tutorial for Faux Granite Counters using resin as a guest post. If you’re looking for a way to spruce up some aging counters, this is for you! (This post contains affiliate links. If you click one and make a purchase, I may receive a commission at no additional cost to you!).
Here’s Sasha!
I love the look of granite counter but I just don’t have the budget for it on a teacher’s salary! The look of granite counters can enhance any kitchen or bathroom and it’s often at the top of people’s home makeover wishlist.
Unfortunately, it is too expensive for most. Even the granite alternatives, like Silestone or quartz, can be costly. But there is an alternative! Faux granite counters (or painted granite countertops) aren’t as difficult as you think!
Granite Counter Alternative
When I bought my house in 2012 I was recently divorced and didn’t have the time or money to update the bathrooms
Don’t get me wrong, they weren’t horrible, just a little plain – white laminate cabinets and chipped gray laminate counters.
The first thing I did was replace all the door pulls (which were plain white… The previous owners must have liked white!) with stainless steel pulls.
I also painted the walls and framed the bathroom mirror. These minor (and cheap) changes updated the bathroom but I still wasn’t happy about the counters.
A few years later I saw an idea on Pinterest about painting laminate counters to look like granite. I was really excited by the idea but also very nervous as I didn’t want to ruin the counters (that would be an expensive mistake!). But how hard could painted granite counters be?
My bathroom had a tiny counter, so I decided to give it a try. If I wrecked it, at least it wouldn’t be too expensive to replace!
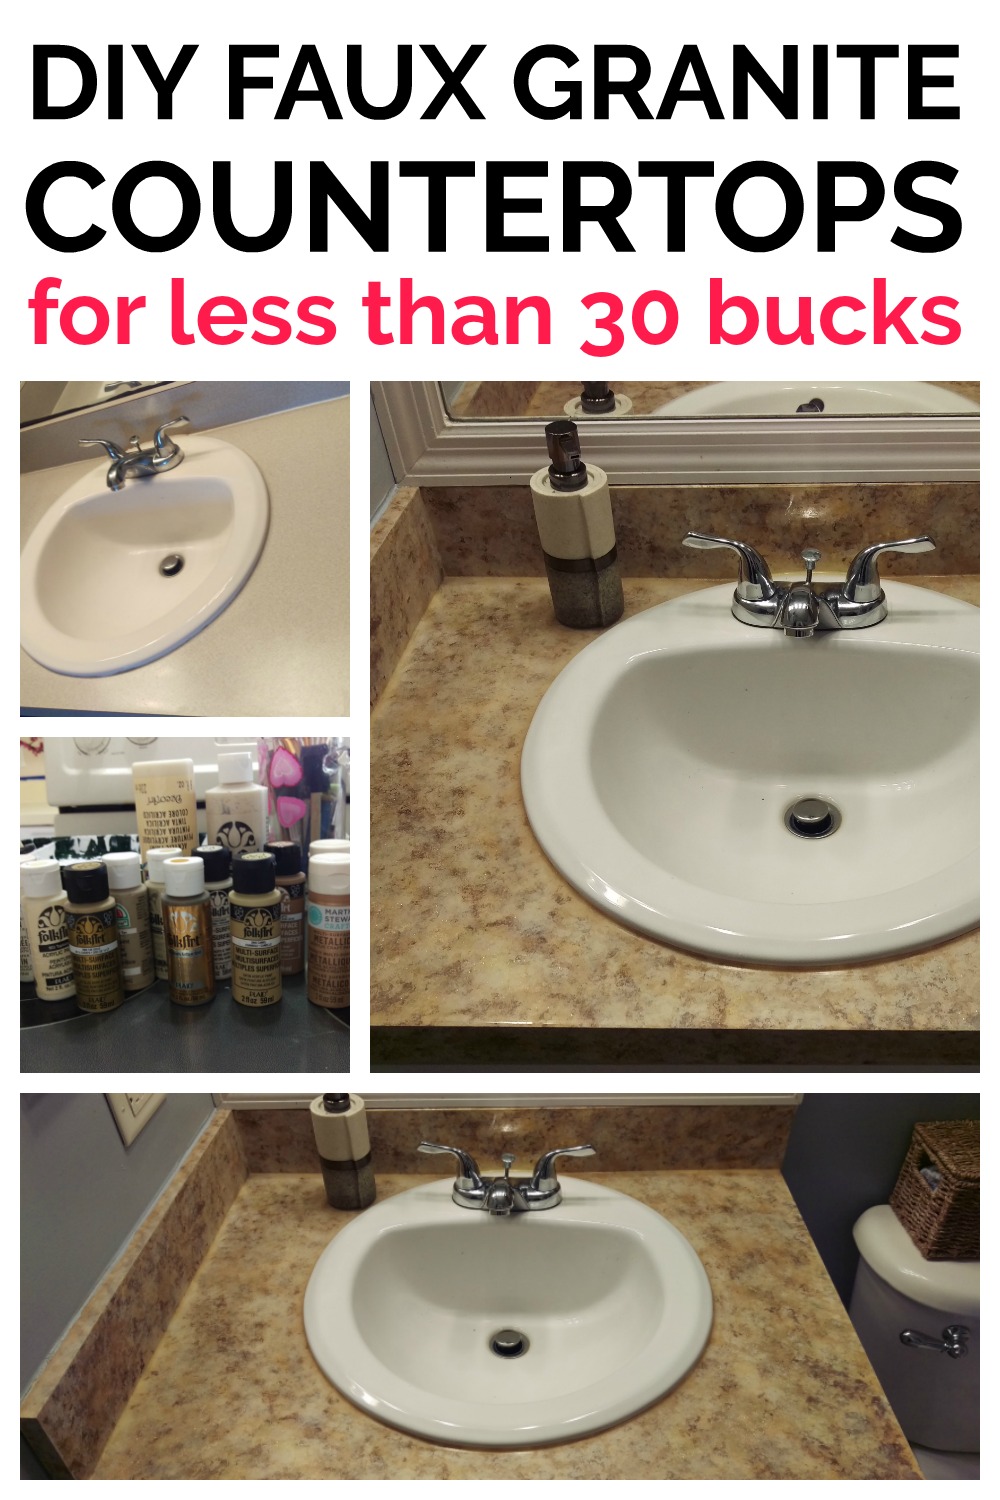
So one weekend I gathered my supplies and got to work! Below are the steps I used, along with *tips* on what to do, to transform ugly counters into faux painted granite counters… for UNDER $30!
Faux Granite Counters
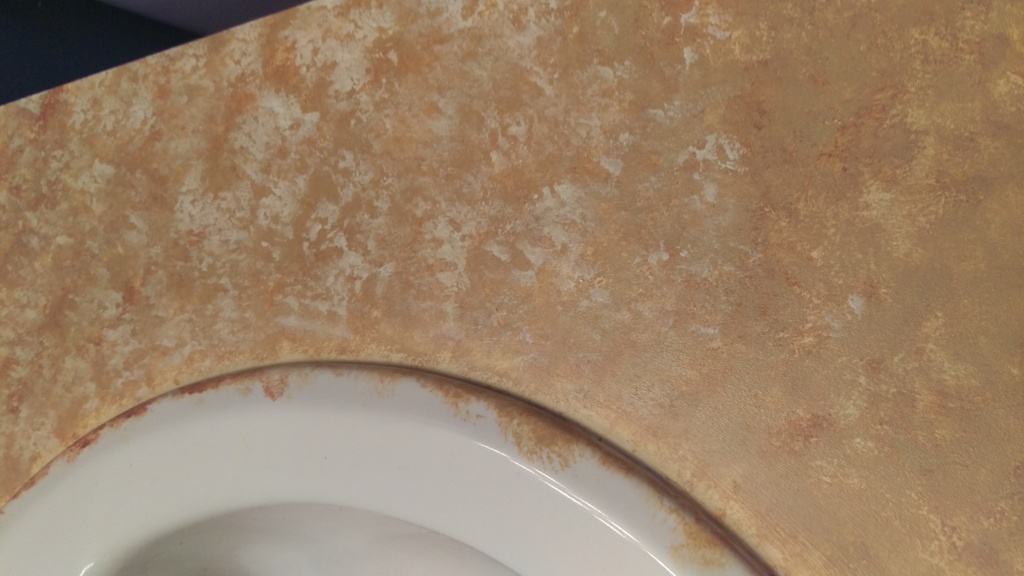
Here’s the “before” of my bathroom:
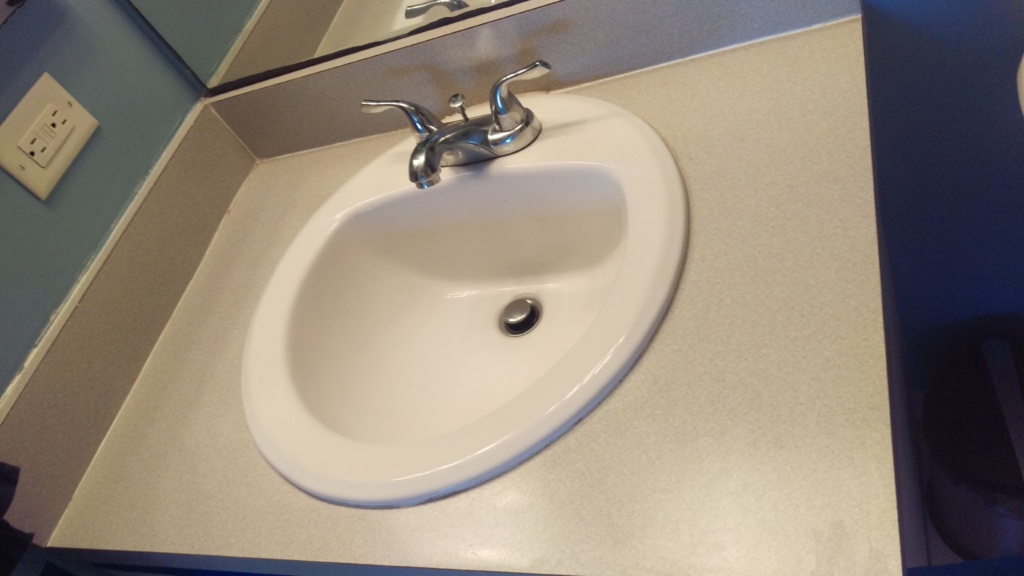
Not completely horrible, but not the “spa” look I would like in my bathroom. Now do you see why I wanted to try faux granite counters?
Supplies
The supplies are all relatively cheap and easy to get hold of. If you use coupons (if you shop at Michaels or Joanns) or buy through Amazon (the cheapest source for most of the products that I could find), then you should be under $30. I used the following:
- Kilz Hide-All Primer
- Selection of brown, beige and metallic acrylic paints
- Enviro Tex Epoxy Resin *
- Fine glitter
- Foam roller
- Paint brushes – various sizes
- Sea Sponge
- Plastic grocery bags
- Paper plates (or something else to put your paints on)
- Painters tape
- Plastic sheeting to protect your cabinets and floor
- Cleaning products
- Fine grit sandpaper
*A quick note about the Enviro Tex: it gives a shiny, hard and water resistant surface. However, it is not the easiest thing to work with (more on that later), but I found it gave the best finish. I did also try Polyacrylic sealer but I didn’t like the finish it gave, as it was difficult to get it smooth. I feel for faux granite counters that look real, your best bet is an epoxy resin.
Step 1 – Prepare your Counters
The very first thing you want to do is clean your counters very well. You want to remove all trace of grease, dirt, soap scum, residue… well you get the idea.
The surface needs to be completely clean, then you can lightly sand the finish so your primer paint has something to hold onto. The preparation steps are the most boring, but they are also the most important.
If your surface isn’t cleaned and sanded properly, your beautiful faux granite counters might start to peel or chip after a few weeks wear.
Step 2 – Protect Your Cabinets, Walls, and Floors
You want to make sure you use painters tape where your counter met the wall (or mirror if you’re doing it in the bathroom). You also want to use the plastic sheet to protect your cabinets and floor.
I used painters tape to attach the sheet all around my cabinets and on to the floor.
*Tip* If you are using the epoxy resin for your faux granite counters, it will drip down the cabinets and on to the floor. It is VERY difficult to clean up, so take your time to protect your surfaces and floor. You’ll thank me later!
Step 3 – Prime Your Counter
Using a small foam roller and the Kilz Hide-All Prime (or any other multi-surface primer) to apply a thin layer of paint to the entire surface.
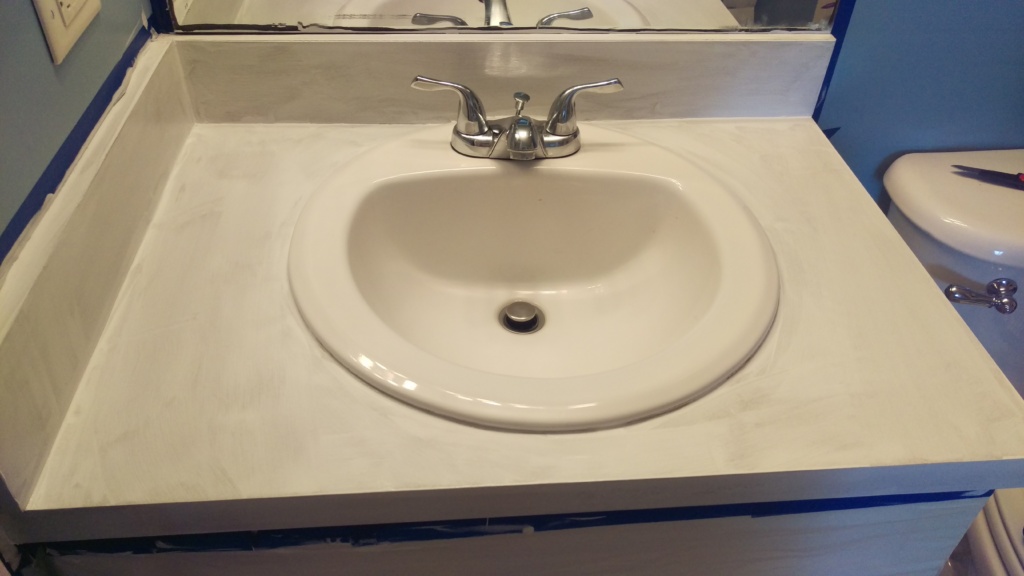
If you want you can wait for it to dry and apply a second coat. This isn’t completely necessary, but if your old laminate counter finish is very dark, you might want two coats to make sure it’s completely covered.
In this photo you can see I have done just one coat, this will give you an idea of the coverage you will get.
Step 4 – Apply Your Base Color
Next, you want to apply your base color (acrylic paint in this case). I used a foam brush for this step, but you could use the small roller again if you prefer.
The color you pick will depend on the granite coloring you are going for. Go online (here) and look at lots of different granite patterns, pick one that appeals to you. Then look carefully at the colors and decide which one is the main color – this was my base color. Apply more than one coat if needed.
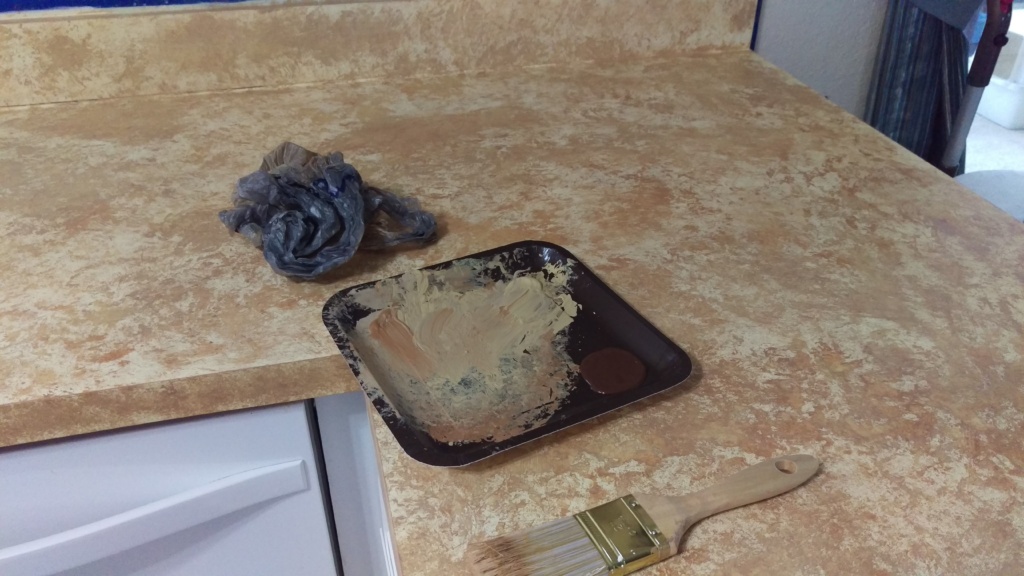
Step 5 – Layer on Your Colors
Now, this is the fun part! Once your base color is completely dry, you can start using your different tools (plastic bag, sea sponge, different brushes etc) to layer the different colors.
Again you want to look at the photo of the granite you like and study the density and depth of the colors.
I used a paper plate as a palette for my paints. By squeezing three or four colors around the edges of the plate, I could then mix the colors until I got the perfect color. If you are going for a lighter colored granite then you want to start off with your darker colors and go lighter as you build your layers.
*Tip* You might also want to use some metallic paints in your top layers, as this will give a very realistic finish to your faux granite counters.
There are many different ways to apply the paint. One of my favorites was using a plastic grocery bag. Bunch up the bag and dip it in the paint, then on a piece of paper or paper towel, dab off the excess paint.
Lightly dab the paint onto your counter. It can take a few attempts to get it right, so you might want to experiment on a piece of paper or cardboard first. You want a very thin coat, so the color behind still shows through. You can also use the same technique with a stippling brush or sea sponge – these will give you slightly different textures.
I also used a very small amount of glitter to give the metallic look that a lot of granite has. Go easy on these, as a little goes a long way.
You don’t want it looking like a preschooler’s art project! Now be patient and let everything completely dry.
Step 6 – Applying the Epoxy Resin
This is the trickiest step in getting your faux granite counters!
First you want to measure your counter, to find the square footage and make sure that you have enough epoxy resin. There is a guide on the back of the box that tells you how much you will need. *
Tip* Or look at this chart – they also have a handy tool to help you calculate the area.
If you don’t have enough it is almost impossible to add more later without ruining the finish. Trust me… this happened when I did my kitchen counter!
Please, please, please read the instructions with the Epoxy very careful and follow them completely. It is very important that the solution is thoroughly mixed before you start. If you don’t it won’t set properly and you will have soft, sticky spots.
I didn’t take any photos when I applied the epoxy because it is very messy and you need to work quickly. Basically, you pour the resin over the counter and then use a flat straight edge (I used a wooden paint stirrer) to spread it evenly over the surface.
It is much harder to do the vertical edges (backsplash or counter edges) – I found a foam brush was the best way to apply it. You won’t get a very thick coat on the edges.
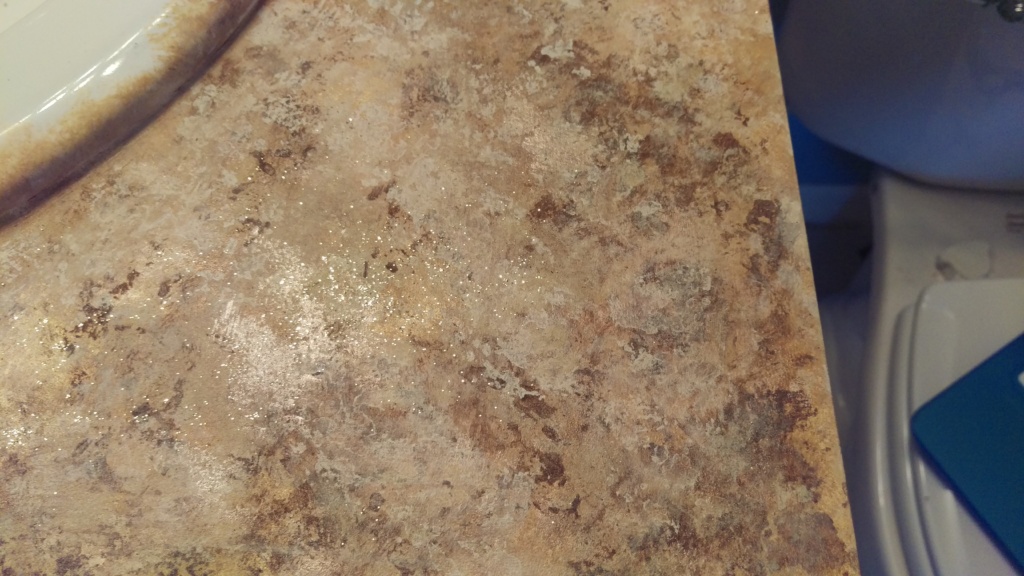
Step 7 – Let it Dry!
Once you have an even layer you will need to leave it to dry. Check the box for drying times – but I left mine for 3 days before putting anything on it.
For the first hour or 2, as it is drying you will see tiny bubbles come to the surface. The easiest way to get rid of these is with a small gas torch.
I didn’t have one of those, so the next best thing is to use a straw and blow on the bubbles. Basically, the heat from your breath (or the gas torch) pops the bubbles.
*Tip* As you blow in the straw it will get saliva inside it (gross, I know!). Change the straw or shake it out often, as you don’t want the saliva dripping out the end of the straw onto your new pretty faux granite counters!
The epoxy will drip onto the floor, that’s why it is so important to have prepared properly and have plastic sheeting taped to the floor.
*Tip* Make sure it is taped, as the plastic will get sticking with the resin and stick to your feet… then the plastic moves around!
As the counters are drying, you will want to run a brush along the bottom edge of the counter every 5-10 minutes you remove any drips that start to form. If you don’t do this, the bottom edge will end up very bumpy and unattractive.
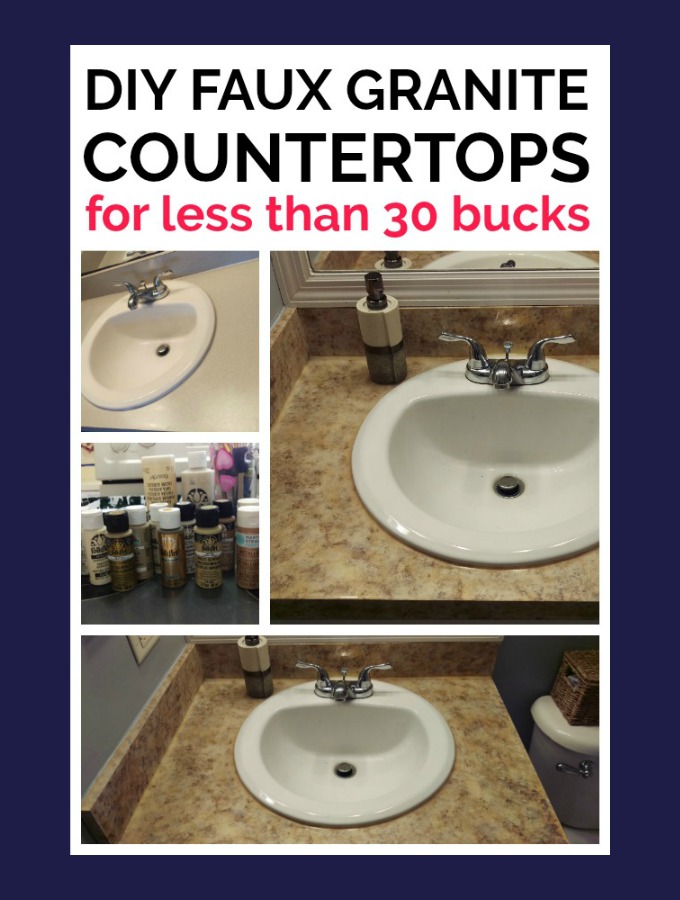
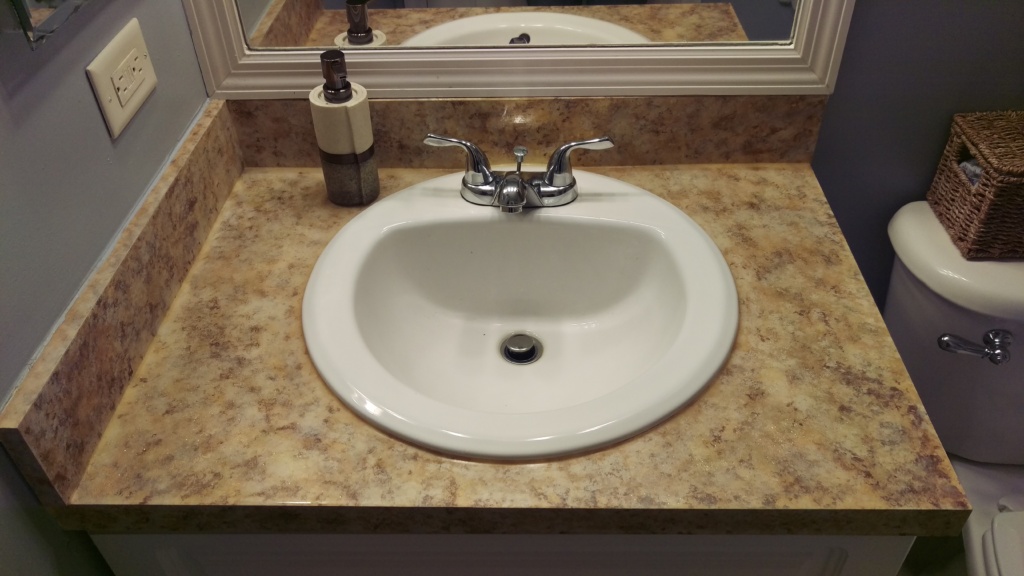
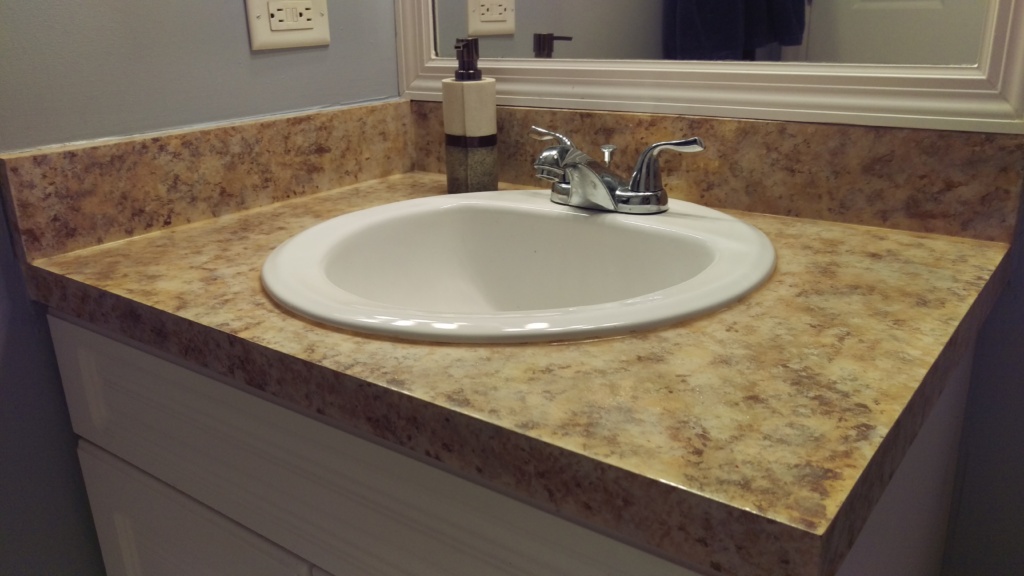
The reveal!
So here is the finished product of my faux granite counters!
I did later use this same technique on my kitchen counters (they were the same gray as the bathroom). That was a much bigger project and I actually made a few more mistakes (like not having enough epoxy and not stirring it properly, so I had soft spots).
As far as the cost goes, it was only slightly more expensive to do the whole kitchen. The biggest cost difference was the epoxy resin. I didn’t buy enough epoxy when I did it… because I didn’t work out the square footage before going to the store!
You definitely have to plan and take your time when doing it on a larger scale. Good luck creating your own faux painted granite counters and let me know how you get on!
Now What?
Thanks Sasha for the great tutorial! Who’s ready to faux granite countertop their countertops?? If you need help with keeping those countertops clean or your whole house in general, you’ll love Life’s Carousel. And if you want to learn more about Sasha and the services she offers, check out this post where I interviewed her!
If you’ve got leftover resin after you finished your countertops, check out these resin craft projects:
So Simple Craft: Easy Painting with Resin
Resin Craft Tutorial: DIY Monogram Necklace
Resin Crafts : The Trend You Have to Try This Year
If You Liked It Then You Shoulda Put a Pin In It!